


Text block
Carl's Place DIY Golf Simulator Enclosure Kit with Impact Screen
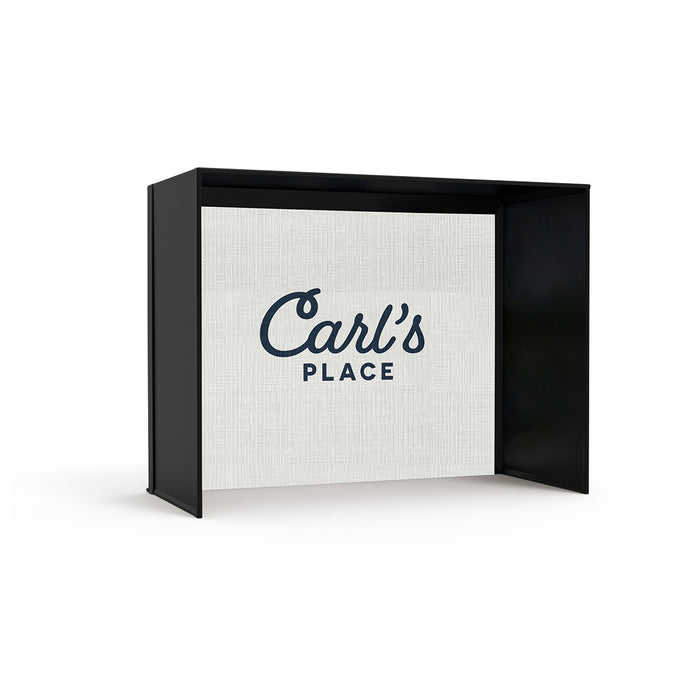
Bring the feel of a professional golf simulator right into your home or garage with the Carl’s Place DIY Golf Simulator Enclosure Kit — the most popular, budget-friendly way to build your own golf simulator setup.
Each DIY enclosure includes:
-
Durable Nylon Enclosure: Heavy-duty black nylon walls and ceiling panels create a clean, finished look while safely containing errant shots.
-
Impact Screen (Full-Floor Coverage): Premium impact screen lets your projected image extend all the way to the floor for a seamless, life-like display.
-
Custom Fittings & Connectors: Includes all the steel corner fittings and detailed instructions to assemble your frame.
-
Easy Framing Options: Choose to source your own pipes locally or make it effortless with the Carl’s Place Pipe Framing Kit — a hassle-free, all-in-one solution.
Now featuring the High-Contrast Gray Premium Screen:
Enjoy sharper image contrast and color definition, even in rooms with ambient light. The gray screen enhances brightness and realism for a more immersive virtual golf experience.
Features & Specifications
Easy DIY Assembly
-
Designed for simple at-home setup — no construction experience required
-
Includes all fittings and instructions for quick, secure assembly
-
Optional Pipe Framing Kit available for complete frame solution
Premium Impact Screen
-
Smooth, tightly woven polyester material engineered for golf impact
-
Excellent image quality and durability for thousands of shots
-
Full floor-to-ceiling image coverage
-
Available in Standard, Preferred, Premium, and High-Contrast Gray screens
Durable Enclosure
-
Heavy-duty black nylon side and top panels
-
Creates a professional look and keeps balls safely contained
-
Removable and washable panels for easy maintenance
Custom Fit for Any Space
-
Multiple sizes available — from compact 8.5 ft setups to large 12+ ft bays
-
Ideal ceiling height: 9–10 ft
-
Compatible with most launch monitors, hitting mats, and projectors
Recommended Add-Ons
-
Pipe Framing Kit – pre-cut pipes for exact fit
-
Golf Simulator Projector – short-throw 1080p or 4K recommended
-
Hitting Mat / Turf Flooring – complete your indoor bay setup
Technical Specifications
| Category | Details |
|---|---|
| Brand | Carl’s Place |
| Product Type | DIY Golf Simulator Enclosure Kit |
| Enclosure Material | Heavy-duty black nylon |
| Screen Material | Tight-knit polyester impact screen (Standard, Preferred, Premium, High-Contrast Gray) |
| Frame Type | 1" EMT steel conduit (user-supplied or optional Pipe Framing Kit) |
| Image Coverage | Full floor-to-ceiling display |
| Recommended Ceiling Height | Minimum 8.5 ft (9–10 ft ideal) |
| Mounting Options | Floor-mounted or ceiling-mounted projector setup |
| Sizes Available | Multiple widths and heights to fit your space |
| Assembly Time | 1–2 hours (two-person setup recommended) |
| Compatibility | Works with most launch monitors (Mevo+, Garmin R50 Approach, SkyTrak, Uneekor, Bushnell Launch Pro) |
| Best For | Home simulators, garages, basements, and commercial golf bays |
| Add-Ons | Pipe Framing Kit, Hitting Mat, Projector, Turf Flooring, Net Extensions |
Recommended Setup Guide
Room Size & Clearance
-
Ceiling Height: Minimum 8.5 ft (9–10 ft ideal)
-
Room Width: At least 10 ft (12–15 ft preferred for centered hitting)
-
Room Depth: 15–18 ft total (ball flight + hitting zone + projector distance)
Projector Placement
-
Best with short-throw projectors (throw ratio 0.5–1.0:1)
-
Mount 8–10 ft from screen, either on floor or ceiling
-
Recommended 1080p or higher native resolution
Lighting Tips
-
Use dim or indirect lighting for optimal brightness
-
Choose High-Contrast Gray Screen for rooms with ambient light
Simulator Compatibility
-
Works with FlightScope Mevo+, Garmin Approach R50, SkyTrak / SkyTrak+, Uneekor Eye Mini, and Bushnell Launch Pro / Foresight GC3
-
Supports simulation software like E6 Connect, GSPro, and The Golf Club 2019
Pro Tip:
Position your hitting mat 10–12 ft from the screen for realistic ball flight and accurate launch monitor tracking.
Why Buy From Total Golf Simulators
At Total Golf Simulators, we specialize exclusively in high-performance golf simulator systems and components — helping golfers bring the course experience home with professional quality and precision.
Why Customers Choose Us:
-
Expertly Curated Products – Only top-rated brands like Carl’s Place, FlightScope, TruGolf, and Garmin
-
Honest, Expert Guidance – Real product advice from simulator setup specialists
-
Fast, Reliable Shipping – U.S.-based warehouses with tracked delivery
-
Secure Online Shopping – Safe checkout and dedicated customer support
-
Build Your Complete Setup – Enclosures, launch monitors, projectors, mats, and more
Whether you’re building your first simulator or upgrading to a pro setup, Total Golf Simulators is your trusted partner for all things golf simulation.
Carl’s Place Warranty
-
Warranty is subject to the manufacturer’s terms (as detailed in Carl’s Place’s Terms of Sale)
-
Warranty may cover defects in materials or workmanship
-
To make a warranty claim, follow the instructions included with your product or refer to the manufacturer’s warranty documentation
-
Repairs, replacements, or refunds under warranty are processed according to Carl’s Place’s standard policies
Carl’s Place Return & Refund Policy
-
Return Window: Most Carl’s Place products may be returned within 30 days of delivery
-
Condition: Items must be unused, in new condition, and in original packaging
-
Restocking Fees:
• Up to 30% restocking fee may apply
• Custom or non-standard products may incur higher restocking fees (up to 50%) -
Return Shipping: Customer is responsible for return shipping costs and must get prior approval before returning items
-
Non-Returnable Items: Custom dimensions, clearance items, or opened goods may not be eligible for return
-
Inspection & Refunds: Returned items are inspected; refunds issued only if product meets condition requirements. Partial or no refund may be given for items not in acceptable condition
-
Note: These are Carl’s Place’s standard policies — your store (Total Golf Simulators) may add additional terms; always refer to your order confirmation or store policy for final details