
Customer Svc: 855-620-2330 -
M-Sat -9am-6pm
Speak To Customer Service - 855-620-2330 - M-Sat 9:00am - 6:00pm MST
Customer Svc: 855-620-2330 -
M-Sat -9am-6pm
Speak To Customer Service - 855-620-2330 - M-Sat 9:00am - 6:00pm MST

Last Updated: September 9, 2026
Custom golf simulator design services handle the planning, equipment selection, and installation of a complete indoor golf setup tailored to a specific space, from space assessment to a fully installed, playable system.
The hardest part isn't the equipment, it's integration. A projector with the wrong throw distance, an enclosure that doesn't match ceiling height, or a mat too close to the screen can ruin the experience. Professional design services solve these problems before you spend money.
Total Golf Simulators offers expert guidance for home and commercial environments, providing a curated selection of industry-leading launch monitors, enclosures, hitting mats, and projectors to help you build the perfect indoor golf setup.
The single most important factor in any golf simulator design is ceiling height. For most golfers using a standard driver swing, you need a minimum of 9 feet of clearance; golfers over 6 feet tall or with steeper swing planes should plan for 10 feet.
Room depth matters just as much. You need roughly 7 feet from screen to tee, plus 7 to 10 feet behind the tee, meaning a minimum depth of about 15 to 18 feet. For width, plan for at least 10 feet for side netting and enclosure framing.
Beyond the basic swing space, you need to account for the enclosure depth itself. The impact screen and its framing typically protrude 3 to 5 feet from the wall. The official golf simulator space planning guidance consistently emphasizes that most failed installations trace back to underestimating total room footprint, not just the hitting area.
A garage conversion is popular for a custom golf simulator garage conversion because it offers generous square footage and existing power. The first step is clearing the space and evaluating the floor, garage floors are typically sloped toward the door, so you may need a leveling subfloor.
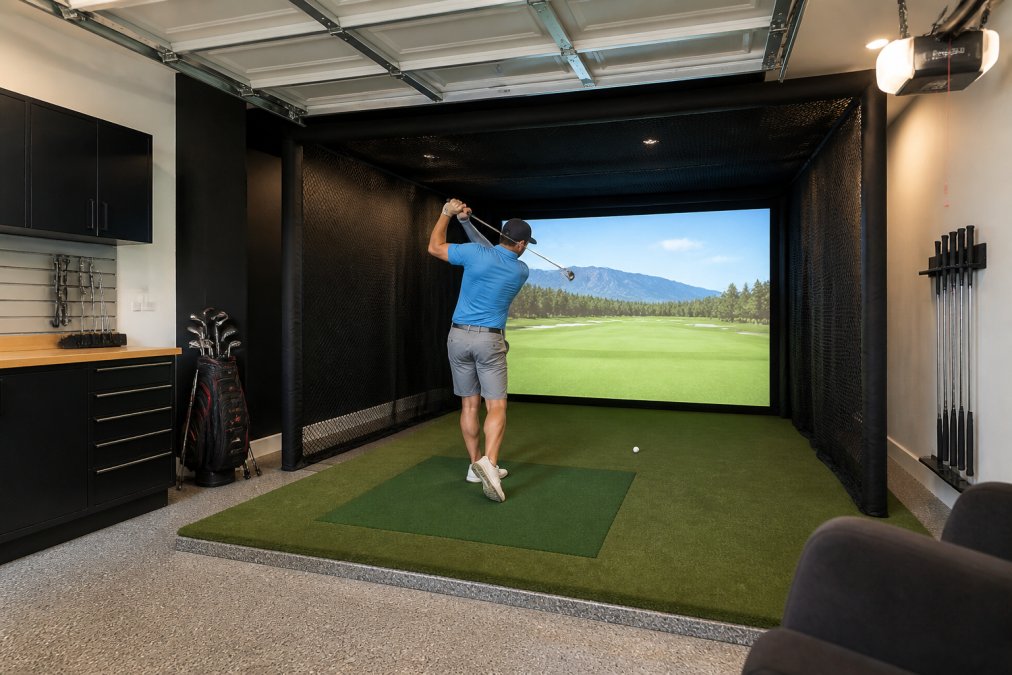
Garage insulation is next. Uninsulated doors and walls create temperature swings affecting comfort and electronics. Many owners install foam board insulation on the door and add a portable HVAC unit, since launch monitors and computers perform best in stable temperatures.
Consider the garage door itself. Most conversions either insulate and seal the existing door or install a wall in front of it. The motorized track and opener hardware can interfere with your swing zone, so measure clearance carefully. A remote control motorized drop down enclosure, like the option at Total Golf Simulators for $2,650, retracts completely when you need to park a car.

Launch monitor compatibility drives every other equipment decision in a golf simulator design. It determines ball flight data accuracy and dictates where you place your hitting area. Radar-based units like Flightscope X3C require significant depth behind the tee, while camera-based systems can mount closer.
The enclosure and impact screen must match your launch monitor's tracking zone. The screen needs to sit far enough from the tee that the launch monitor can see the full ball flight, but close enough that the projected image remains sharp. Most setups place the screen 7 to 10 feet from the tee. The projector throw distance calculator and buying guide helps you determine the correct lens for your room depth and desired screen size.
Projector selection is where many budgets go off the rails. You need a short-throw or ultra-short-throw lens for most residential rooms. Look for at least 3,000 lumens for a dark room, and 4,000 to 5,000 lumens with ambient light. Keystone correction and lens shift give mounting flexibility.
Aspect ratio links your screen and projector. Most modern simulators use a 16:9 widescreen format, while some budget setups use 4:3. Choose your screen first, then match the projector to that aspect ratio. The PGA of America's guide to indoor golf technology notes that integrated software and hardware compatibility is the defining factor between a frustrating setup and a seamless one.
Proper electrical planning prevents the most common installation failures. Most simulator rooms need a dedicated 15-amp or 20-amp circuit for the computer, projector, launch monitor, and motorized enclosure. If converting a garage, verify existing outlets are grounded. A licensed electrician should confirm your service panel has capacity; older homes may have 100-amp panels requiring an upgrade.
Ambient light control directly affects image quality. Blackout curtains, dark paint, and light-blocking enclosure fabric reduce glare. The Carl's Place Pro Enclosure, available for $3,409.95 at Total Golf Simulators, uses BlackStop fabric to darken the interior and boost contrast.
Climate control is critical for equipment longevity and player comfort. A simulator room generates heat from the projector and computer, and a garage loses heat rapidly in winter. You need a system that maintains 65 to 75 degrees Fahrenheit year-round.
A mini-split system is the most common solution because it provides both heating and cooling without ductwork. For a typical 12-foot by 16-foot room, a 9,000 BTU unit is sufficient; for a three-car garage, 12,000 to 18,000 BTU. Mount the indoor head on a wall perpendicular to the hitting zone, never above the tee, to avoid air currents interfering with launch monitor readings.
Humidity is the silent killer. Circuit boards corrode when exposed to persistent humidity above 60 percent, and turf suffers mold growth in high humidity. A mini-split with dehumidifier mode, or a standalone dehumidifier, should keep relative humidity between 40 and 50 percent. In basements, a dehumidifier is non-negotiable, as concrete floors wick moisture year-round.
Airflow matters more than most owners realize. Stagnant air creates hot spots around the projector, shortening lamp life. Install a ceiling fan or low-velocity circulation fan aimed away from the hitting area. If finishing a basement, consider an ERV to bring in fresh air without losing conditioned air.
Plan for future expansion. If you might upgrade to a higher-end launch monitor or add a second screen, run an extra dedicated circuit and install a larger subpanel now. The cost during initial construction is a fraction of retrofitting after drywall is up. dedicated gaming room.
A turnkey home golf simulator installation cost varies dramatically based on room complexity and equipment tier. The enclosure and impact screen typically represent the largest single investment, followed by the launch monitor, then the projector and computer.
For a modular panel enclosure with side walls, expect to invest around $7,150, which covers the premium panel construction that reduces bounce-back and noise. A more flexible option is the Vanish Series Retractable Enclosure at $2,999, which rolls up out of the way when you want to reclaim the room for other uses. The home improvement cost data for garage conversions shows that structural changes, like framing a wall or adding a subfloor, add significant expense beyond the simulator components themselves.

Cost Component |
Entry Level |
Mid-Range |
Premium |
|---|---|---|---|
Enclosure & Screen |
$1,000 - $1,500 |
$2,500 - $3,500 |
$6,800 - $7,200 |
Launch Monitor |
Camera-based budget units |
Mid-tier radar units |
Tour-level tracking |
Projector |
3,000-lumen standard |
Short-throw 4,000-lumen |
High-end laser |
Installation |
DIY |
Partial pro assembly |
Full turnkey |
The line between DIY and turnkey installation comes down to your comfort with electrical work, framing, and precision alignment. Professional assembly services ensure screen tension, projector angle, and launch monitor position are calibrated correctly the first time.
The most common mistake is underestimating the swing zone. Buyers measure the room, purchase an enclosure that fits the wall, then discover the driver swing clips the side netting or ceiling. Always add a buffer of at least 2 feet beyond your full swing radius on every side.
Poor projector placement ranks second. Mounting too low creates shadows, while mounting too high introduces keystone distortion. A ceiling mount directly above or slightly behind the hitting area, paired with lens shift, delivers the cleanest image.
Screen tension is the third silent killer. A screen that is too loose wrinkles and distorts the image, while an over-tightened screen creates excessive bounce-back. Most premium enclosures, including the modular panel systems at Total Golf Simulators, use bungee or hook-and-loop tensioning systems for fine-tuning.
A fourth mistake almost no one discusses until it is too late: skipping the permitting and building code process. A custom golf simulator room is a permanent modification to your home, and local building codes treat it that way.
If converting a garage, you are likely changing the use of the space. Many municipalities require a permit when you add insulation, drywall, or a subfloor because those changes affect fire rating and structural load. In jurisdictions following the International Residential Code (IRC), a garage must have a fire-rated separation from living spaces, typically 5/8-inch Type X drywall on the shared wall. If you frame a new wall in front of the garage door, it must meet the same standard, and the opener and track must be removed or disabled.
Electrical work is the most common permit trigger. Adding a dedicated circuit, relocating outlets, or running new wiring almost always requires an electrical permit and inspection. The National Electrical Code (NEC) requires all receptacles in a garage be GFCI-protected. A licensed electrician will pull the permit; skipping this risks a failed home sale inspection later and, in some jurisdictions, fines exceeding the permit cost.
Structural changes get more involved. If removing a load-bearing wall, you need a structural engineer's stamp on the beam replacement. If adding a subfloor, verify the floor joists can handle the additional dead load. Most residential floors are designed for 40 pounds per square foot live load; a simulator room with heavy turf and furniture adds up quickly.
HVAC modifications also require attention. If tapping into an existing ducted system, your local building department may require a permit and a load calculation. This is why many owners choose a mini-split, a self-contained unit that often requires only an electrical permit.
Treat your simulator build like any other home renovation. A few hundred dollars in permit fees and a couple of inspections are a small price for the peace of mind that your investment is safe, legal, and insurable. Homeowners who skip this step often discover the problem only when the buyer's inspector flags unpermitted work at resale.
Building a custom golf simulator room is a significant investment that rewards careful planning. The difference between an average and exceptional setup comes down to room dimensions, equipment compatibility, and installation precision. Start by measuring your space honestly, then choose components that work together as a system.
Total Golf Simulators simplifies this process with a curated selection of industry-leading enclosures, launch monitors, and projectors, backed by a Price Match Guarantee and free shipping on most items. Whether you are converting a garage, basement, or spare room, our team provides the expert guidance to ensure your setup delivers realistic ball flight and year-round enjoyment. Take our Simulator Finder Quiz to match your space and budget, then get started with Total Golf Simulators and turn your unused room into your favorite place to practice.
A professional design service covers space planning, equipment selection, and installation coordination. That means assessing your room dimensions, recommending a compatible launch monitor, enclosure, projector, and turf package, then handling the technical details like projector throw distance, screen aspect ratio, and cabling. Many services also offer white-glove installation or remote support. The goal is a turnkey setup where every component works together before you hit your first shot.
Turnkey home golf simulator installation cost depends on room size, equipment quality, and whether you need structural work. Enclosure kits range from $999 for a basic DIY bay to $7,150 for a premium modular panel system with side walls. Launch monitors, projectors, turf, and installation labor add to the total. A complete custom room typically runs between $10,000 and $30,000 or more, depending on your choices.
Your golf simulator room dimensions requirements depend on your swing and the equipment you choose. As a baseline, plan for at least 10 feet of depth from tee to screen, plus 7 feet behind the tee for backswing clearance. That means a minimum room depth of roughly 18 feet. Width should be at least 14 feet for a centered setup, and ceiling height should be 9 feet or more for unrestricted driver swings.
Yes, a custom golf simulator garage conversion is one of the most popular options. Standard garages offer the ceiling height and footprint most simulators require. You will need to account for garage door tracks, storage, and insulation. A motorized drop-down enclosure like the Remote Control Motorized Drop Down Golf Sim Enclosure at $2,650 lets you retract the screen when you need the garage for other uses, preserving multi-purpose functionality.