
Customer Svc: 855-620-2330 -
M-Sat -9am-6pm
Speak To Customer Service - 855-620-2330 - M-Sat 9:00am - 6:00pm MST
Customer Svc: 855-620-2330 -
M-Sat -9am-6pm
Speak To Customer Service - 855-620-2330 - M-Sat 9:00am - 6:00pm MST

Last Updated: November 4, 2026
Quick Summary
Screen ripple is prevented by making sure the frame is level and square first, then tensioning the screen evenly in a star pattern rather than pulling hard at one corner. Keep the room at a steady temperature, avoid mounting near heat sources, and reinforce wide spans that sag.
Screen ripple is the most common complaint golfers have about their home simulator, and it's usually fixable. A ripple in your impact screen can distort ball flight data, create odd bounce-backs, and make the whole setup look unfinished. At Total Golf Simulators, we help golfers build enclosures that stay flat from the first swing to the thousandth. Here is how to prevent screen ripple in golf simulator enclosures, starting with the causes and ending with the fixes that actually hold up over time.
Ripples almost always come from one of three sources: uneven frame geometry, tension that's applied unevenly, or the screen fabric responding to its environment. Most people blame the screen itself, but the frame usually deserves the first look.
Think of the screen as a drum skin. It only stays smooth when every point along its edge pulls with the same force. Any spot that pulls harder or softer creates a wave.
A frame that isn't level will pull the screen unevenly, even if your tensioning looks perfect. Check the top rail and both side rails with a level before you mount anything.
A frame that is off by even a quarter inch will show up as a diagonal ripple across the screen. Fix the frame first, and many "screen problems" disappear.
Impact screens are typically made from polyester or mesh-backed materials, and both respond to moisture and heat. In humid basements, fabric can relax and sag. In a garage that swings from cold winter nights to warm afternoons, the material expands and contracts.
A common approach is to keep the room at a steady temperature and avoid mounting the screen right next to a heat source or open door.
Most ripple problems are baked in at installation. Rushing this step means you'll spend months chasing waves.
Watch out: Pulling the screen hard at one corner to "fix" a wave usually creates two new ones. Adjust gradually from the center outward instead.
Tensioning is where most DIY setups go wrong. The goal is even pull across the whole screen, not maximum pull. A screen that is tight in the corners and loose in the middle will ripple no matter how many times you adjust it, so treat tensioning as a sequence of small, measured adjustments rather than one big pull.
Ball bungees give you a flexible, even pull along the edges. Releasable zip ties let you adjust a single section without redoing the whole screen. Grommet spacing should be consistent, usually every 6 to 8 inches along the edges.
Work in a star pattern: top center, bottom center, left center, right center, then the corners. Tighten each point a little at a time, and check the screen after each round.
Watch out: Pulling one corner hard to chase a wave shifts the problem to the opposite corner and usually creates two new ripples. If a single point needs a lot of adjustment, stop and check the frame for square first.
Most guides treat every impact screen the same, which is one of the main reasons ripples come back.
Polyester screens hold tension well but can show creases if pulled too hard at the edges. Tension them evenly and check the screen again after it has settled.
Mesh-backed screens can stretch over time, especially in humid rooms, so check their tension periodically.
Both polyester and mesh: Avoid over-tightening, which can cause fabric fatigue at the grommets.
If you are unsure which material you have, check the manufacturer's spec sheet.
All Sports Systems SkyBridge Screen Sag & Ripple Prevention Kit →
The bottom edge is where sag shows up first, because gravity pulls the fabric down over time. A tight top edge with a loose bottom edge produces a visible bulge in the middle.
If your frame uses standard EMT conduit poles, they can bow under load, especially on wider spans. Our SkyBridge Screen Sag & Ripple Prevention Kit ($325.00) uses SkyBridge steel span brackets designed to replace EMT screen poles with rigid Unistrut channel. See the kit's fit and installation details before you order.

Bounce back happens when the ball strikes a screen that has too little cushioning or sits too close to a hard surface behind it. Impact noise is often the same problem showing up as a loud thump.
Leave enough distance between the screen and the wall or any hard surface behind it. Once the screen spacing and hardware are sound, check the turf for uneven spots, since a level surface helps keep the enclosure setup consistent and can point to when it is time to fix lumpy turf.
Different ripple patterns point to different causes. Matching the pattern to the fix saves a lot of guesswork.
Walk through this list before changing anything major. For more fixes that follow the same troubleshooting logic, see our winter practice setup guide. In many cases, one small adjustment resolves the whole problem.
Different ripple patterns point to different causes, so matching the pattern to its fix saves a lot of guesswork.
Ripple pattern |
Likely cause |
Fix |
|---|---|---|
Diagonal ripple from one corner |
Frame is out of square |
Re-level and reshim |
Horizontal waves across the middle |
Top or bottom tension is uneven |
Retension in a star pattern |
Sag at bottom center |
Bottom edge loose or pole bowing |
Tighten bottom and check the span |
Vertical wrinkles at the sides |
Side tension too high or uneven grommet spacing |
Adjust side tension and grommet spacing |
Ripples only in winter or summer |
Humidity or temperature swings changing fabric |
Stabilize the room |
If your frame is solid and level but the screen still sags across a wide span, the frame itself may need reinforcement. This is the gap most screen-ripple guides miss: ripples are often caused by frame deflection, not by the screen fabric. A simple DIY upgrade uses Unistrut channel in place of a single EMT pole, held in place with steel span brackets.
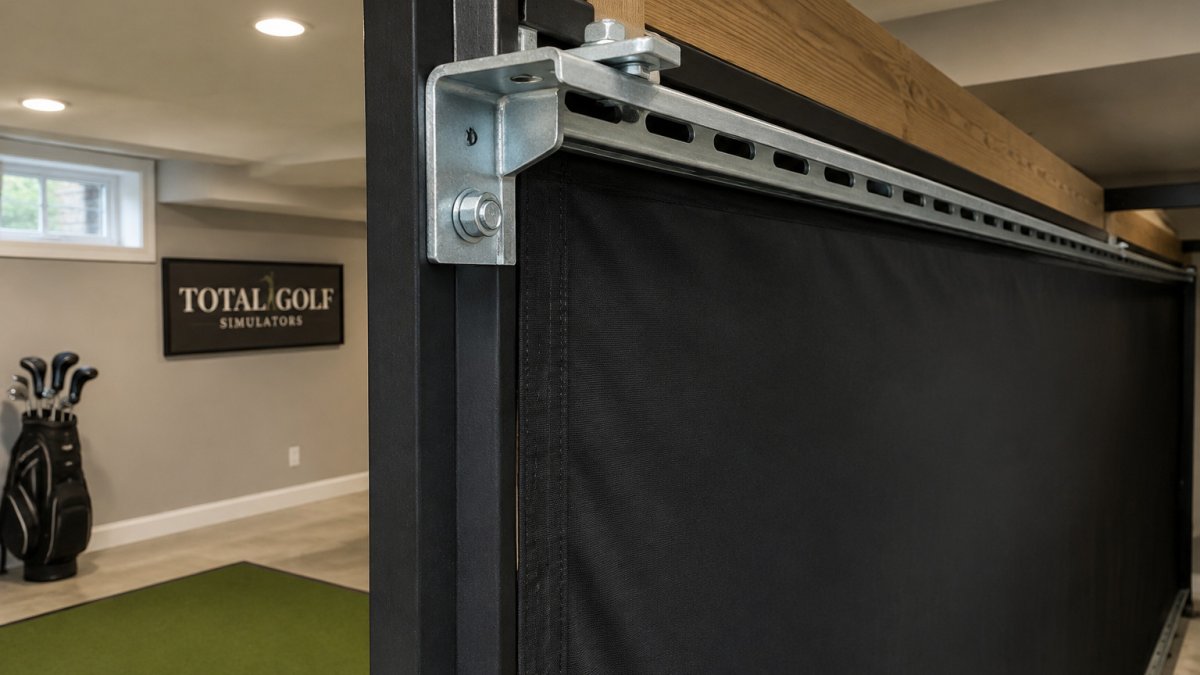
Standard EMT conduit poles can bow under load, especially on wider spans. A 1-inch EMT pole across a 10-foot span will deflect noticeably when the screen is tensioned, and that deflection shows up as a horizontal wave across the middle of the screen. To check for bowing, lay a straightedge or a taut string line along the pole after the screen is tensioned. Any gap between the string and the pole is deflection.
Unistrut is easy to find at most hardware stores, and it resists bowing far better than conduit. The Skybridge kit above supplies the brackets. Mount the channel level, confirm it sits flush with your screen plane, and then retension the screen. The result is a flatter surface and more consistent ball data.
A step-by-step approach that most DIY builders follow:
Watch out: Mounting the Unistrut channel out of level will create a new diagonal ripple that is harder to fix than the original sag. Check level at both ends and in the middle before you tighten the brackets.
Reinforcement makes sense when the frame is otherwise sound and level and the only problem is deflection across a wide span. If the frame is out of square, bent, or made from undersized poles throughout, reinforcement may not be enough and a frame upgrade is the better path.
Once the frame is rigid, keep an eye on tension over time. Ripples that return after a few months usually mean the fabric has relaxed, not that the frame has failed.
If you've worked through this guide and still see ripples, a second set of eyes can save time. Our team at Total Golf Simulators can review your frame, screen and mounting hardware and point out what's causing the problem. We cover both home and commercial enclosures, and we're happy to walk you through the options that fit your room.
Most setups place a cushioning layer behind the impact screen to absorb ball energy and reduce noise. Keep the area behind the screen clear of hard objects such as the launch monitor mount, and check that the screen's grommets and mounting hardware carry the load evenly. The goal is a surface that stops the ball without bowing, since bowing is a direct cause of ripples and bounce back.
The screen should be taut enough that it shows no visible sag or wave when you look at it from the side, but not so tight that the grommets pull hard against the frame. Tension it gradually and check it after it has settled.
Ripples usually come from uneven tension, a frame that is not level, or poles that sag over wide spans. Humidity and temperature swings make polyester fabric expand and contract, which magnifies any tension imbalance. Check the frame with a level before you tension the screen, and replace weak EMT poles with rigid spans if the screen bows between mounting points.
Level and square the enclosure frame first, then attach the screen to the top rail and work down, placing grommets evenly and keeping spacing consistent. Adjust tension gradually and recheck it after the screen has settled.
