
Customer Svc: 855-620-2330 -
M-Sat -9am-6pm
Speak To Customer Service - 855-620-2330 - M-Sat 9:00am - 6:00pm MST
Customer Svc: 855-620-2330 -
M-Sat -9am-6pm
Speak To Customer Service - 855-620-2330 - M-Sat 9:00am - 6:00pm MST

Last Updated: October 13, 2026
Ball speed and smash factor are the foundation of distance control. Ball speed measures how fast the ball leaves the clubface; smash factor measures strike efficiency (ball speed divided by club speed). Together they reveal whether you're making solid contact or leaving distance on the table.
Most golfers assume they're hitting the ball as far as possible; launch monitor data often proves otherwise. A golfer with 90 mph swing speed producing 120 mph ball speed (1.33 smash factor) is solid, but dropping to 115 mph ball speed at the same club speed means something changed at impact, likely a glancing blow or off-center contact.
The fix: focus on consistency first, distance second. Establish a baseline smash factor per club, a driver should produce roughly 1.48-1.50 on center strikes, mid-irons 1.35-1.40. Once you know your target, you can identify which swings hit it, and this feedback loop accelerates improvement far faster than guessing by feel.
Eliminate the mishits, and distance follows.
Launch monitor data can feel overwhelming: most devices track 15-20+ metrics. But the key metrics that drive improvement are ball speed, club speed, launch angle, spin rate, club path, and face angle.
Ball speed and club speed establish your power baseline in miles per hour, showing how hard you're swinging and how efficiently the ball leaves the clubface.
Launch angle (degrees) determines how high or low your shot climbs. Too low loses carry distance; too high balloons with excess spin.
Spin rate (RPM) controls trajectory and stopping power. More spin keeps the ball airborne longer but increases air resistance; less spin reduces drag but sacrifices stopping power on the green.
Club path (degrees) shows the direction your clubhead travels at impact. Positive means right of the target line (for right-handers), negative means left. Ideally it aligns with your intended target line.
Face angle (degrees) indicates where the clubface points at impact, relative to the target line. The difference between face angle and club path determines shot direction and curve.
Club path and face angle are the two primary drivers of shot direction. Understanding how they interact is key to fixing directional misses and building repeatable accuracy.
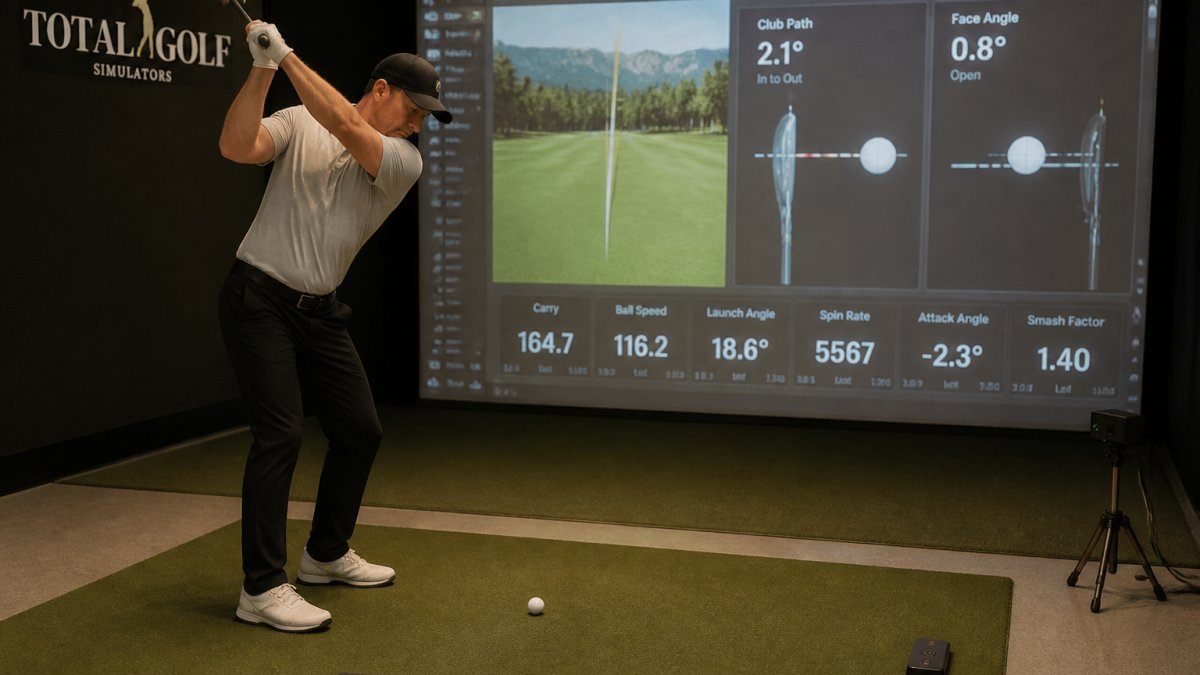
Club path is the direction your clubhead moves through impact; face angle is where the clubface points. When the two numbers are close, the ball flies relatively straight. When they diverge, it curves.
If your club path is 2 degrees right and your face angle is 4 degrees right, the ball curves slightly right because the face is open relative to the path.
The strategy is to identify which metric causes your misses.
Launch monitors give you this diagnosis instantly, which is why learning 7 ways to improve golf swing with launch monitor data accelerates your improvement so dramatically. After 10-15 shots, you'll see a pattern.
A slice, a shot curving dramatically right for right-handers, almost always stems from an out-to-in club path or an open face angle at impact. Launch monitor data tells you which is your culprit.
If your club path is relatively square (within 1-2 degrees of target) but your face angle is 5+ degrees open, your problem is face control, not swing path.
The fix depends on your diagnosis. For an out-to-in path, do swing plane work: shallow your downswing and feel like you're swinging more from the inside.
Use your launch monitor to verify the fix. After a swing change, hit 5-10 shots and compare metrics to your baseline.
Many golfers spend months chasing a slice without data. With a launch monitor, you can pinpoint the cause in minutes and measure progress every session.
Shot dispersion, the pattern of where shots land relative to target, reveals consistency issues raw metrics can't show. Most launch monitors display it as a scatter plot after a session.
Tight dispersion means shots land close together (consistency); wide dispersion means they're scattered (inconsistency). The goal is always tighter dispersion, regardless of where the cluster lands relative to target.
If all your shots land 10 yards right but are tightly grouped, you have an easy-to-fix directional bias: adjust your aim or swing to move the cluster left.
Set a dispersion target per club: a driver should stay within 20-25 yards side-to-side and 15-20 yards front-to-back over 10 shots; an iron tighter at 12-15 yards side-to-side and 10-12 yards front-to-back. Once you have a baseline, track improvement session to session.
This is where practice becomes deliberate: you're not just hitting balls, you're measuring whether dispersion is tightening. When it does, you know your changes are working.
Garmin Approach R50 Indoor & Outdoor Launch Monitor w/Built-In Simulator →
Generic practice, hitting 50 balls without a specific goal, wastes time. Measurable drills with launch monitor targets accelerate improvement dramatically.
The Smash Factor Consistency Drill targets center-face contact. Set a target smash factor from your baseline (e.g., 1.48 for driver), hit 10 shots, and count how many meet it.
The Club Path Alignment Drill focuses on swing plane. Set your target club path (ideally within 1-2 degrees of target), hit 10 shots, and measure how many fall in range.
The Launch Angle Control Drill builds trajectory consistency. Set a target launch angle per club (driver 14 degrees, 6-iron 18 degrees, etc.), hit 10 shots, and track how many hit the range.
The Face Angle Accuracy Drill sharpens directional control. Set a target face angle (ideally square to target line), hit 15 shots, and measure your average.
Each drill takes 10-15 minutes and produces immediate, measurable feedback. That's the power of launch monitor data: practice becomes quantified, not subjective.
| Drill | Target | Duration | Frequency | Expected Improvement |
|---|---|---|---|---|
| Smash Factor Consistency | 1.48+ (driver) | 10 minutes | 2-3x per week | 40% to 70%+ in 2-3 weeks |
| Club Path Alignment | Within 1-2° of target | 12 minutes | 2x per week | Tighter dispersion within 1 week |
| Launch Angle Control | Club-specific target | 10 minutes | 1-2x per week | More consistent carry distances |
| Face Angle Accuracy | Square to target line | 15 minutes | 2x per week | Reduced directional misses |
Random practice produces random results. A structured template ensures every session builds on the last and tracks cumulative progress.
Start with a 5-minute warm-up: hit 10 shots with your most comfortable club (usually a mid-iron) to establish baseline metrics and a reference point for the day.
Next, spend 20 minutes on your primary focus area, the Club Path Alignment Drill for path consistency, or the Smash Factor Consistency Drill for strike consistency.
Then spend 10 minutes on a secondary drill targeting a different metric, launch angle control if your primary focus was club path, to avoid neglecting other metrics.
Close with 10 minutes of free play: different clubs, targets, and distances to mimic on-course conditions.
Record metrics in a simple spreadsheet: date, primary focus, smash factor average, club path average, face angle average, dispersion pattern, and notes.
This structure transforms practice from guesswork into measurable progression: you know what you're working on, measure whether it's improving, and adjust based on data.
The real power of launch monitor data emerges over weeks and months. A single session shows today; tracking across sessions reveals trends that show where to focus next.
Create a simple tracking system: every week, record average metrics per club, ball speed, club speed, smash factor, launch angle, spin rate, club path, face angle.
Maybe your driver smash factor improved from 1.42 to 1.46 over a month, progress. But your 6-iron face angle still ranges from 2 degrees open to 3 degrees closed. That's your biggest opportunity for the next month.
This data-driven prioritization separates effective practice from wasted effort. Most golfers practice whatever feels wrong that day; data-driven golfers practice whatever the numbers show needs work most.
Over time you'll notice patterns tied to conditions, smash factor dropping in humidity, or club path getting inconsistent when tired. That insight shapes how you prepare for on-course rounds.
The launch monitor becomes your personal coach, providing feedback impossible to get from feel alone.
Improving your golf swing with launch monitor data requires consistency, structure, and honest self-assessment. At Total Golf Simulators, we recommend starting with the Garmin Approach R10 or FlightScope Mevo Gen2 for home practice. Either device paired with a structured practice template will accelerate your improvement far beyond what guesswork alone can achieve. Garmin's official launch monitor specifications and FlightScope's technology documentation provide detailed metric definitions if you want to dive deeper into the data.

A launch monitor provides immediate, measurable feedback on every shot by tracking ball speed, launch angle, club path, face angle, and spin rate. This data reveals exactly what your swing is doing at impact, allowing you to identify flaws and verify improvements in real time. Instead of guessing whether a change worked, you see the results instantly. Most golfers find that visual feedback combined with specific metrics accelerates learning and builds swing consistency faster than practice alone.
Start with ball speed, launch angle, and carry distance, these three metrics tell you whether you're making solid contact and generating power. Next, track club path and face angle, which reveal the root cause of directional misses. Finally, monitor spin rate and shot dispersion to understand consistency. Don't try to optimize everything at once; pick one metric, work on it for a practice session, and measure the result. This focused approach prevents information overload and builds sustainable improvement.
A slice typically results from an open clubface relative to your swing path. Use your launch monitor to measure both metrics at impact. If your face angle is right of target and your club path is even more right, your face is closed relative to the path but still open to the target, this creates the slice spin. Work on closing the face or shallowing the path, then check the numbers again. Most golfers see slice correction within 10-15 shots once they understand which metric to adjust first.
Club path measures the direction your clubhead is moving through impact, independent of where the face is pointing. If your path is significantly right of target (for a right-handed golfer), you're likely swinging over the top or coming from outside-in. A path left of target suggests an inside-out swing. Club path is crucial because it's one of the two factors determining shot direction; the other is face angle. Understanding your path helps you identify whether your miss is a path issue or a face issue, making corrections much more efficient.
Yes, launch monitors provide self-coaching feedback that many golfers use successfully. The data shows you what's happening at impact, and you can experiment with swing changes and see immediate results. However, a launch monitor doesn't diagnose the cause of a flaw, it only shows the result. A golf instructor can interpret the data and recommend specific drills to fix the root issue. Many golfers combine both: use the monitor to track progress and stay accountable, and work with an instructor periodically to validate technique and prevent bad habits.